How do I use My EyeTV with the iPhone?
My EyeTV
Elgato’s free My EyeTV service helps your iPhone or iPod touch find your Mac running EyeTV when you are on the road.
My EyeTV requires EyeTV 3.2. or later.
Register for My EyeTV
There are two ways you can sign up to use My EyeTV.
1) EyeTV Setup Assistant:
This method will only work if you are in the United States or Canada. If you are elsewhere, then skip down to step 2, iPhone section of EyeTV Preferences.
Register to use TV Guide with EyeTV, via the EyeTV Setup Assistant. The email address and password you choose with serve both as a TV Guide and My EyeTV login.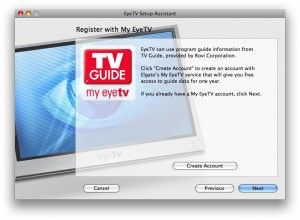
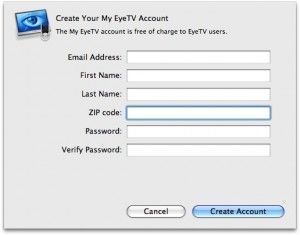
Press “Create Account” to start the process. You will be given a form to fill out – the email address and password you choose will let you log into My EyeTV, as well as TV Guide.
The TV Guide login is only accepted via the Guide section of the EyeTV Preferences – it does not work with TVGuide.com.
2) iPhone section of EyeTV Preferences:
Register to use My EyeTV via the EyeTV app. Visit the EyeTV Preferences, and choose the iPhone section.

Under My EyeTV, choose the Change… button.
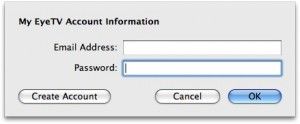
Press Create Account to start the process. You will be given a form to fill out – the email address and password you choose will let you log into My EyeTV.
The TV Guide login is only accepted via the Guide section of the EyeTV Preferences – it does not work with TVGuide.com.
Testing the My EyeTV Connection
After you sign up for your My EyeTV account, visit the iPhone section of the EyeTV Preferences, and make sure “Enable access from EyeTV to iPhone” and “Use My EyeTV” are turned on.
You will see a yellow circle, next to the message “My EyeTV: Testing”, as EyeTV on your Mac checks in with Elgato. The following steps are happening behind the scenes during this process:

1) EyeTV is informing Geniatech of your Mac’s public IP address, so that EyeTV on the iPhone can find your Mac at home.
2) EyeTV also tries to open up port 2170 (the EyeTV port), and forward it to your Mac.
3) To perform this automatic port forwarding, you must be using a router that supports NAT Port Mapping Protocol (NAT-PMP) and Universal Plug and Play (UPnP).
If there is a problem with My EyeTV, then the circle will turn red, with the message “My EyeTV: Router Incompatible”.
Troubleshooting the My EyeTV Connection
If EyeTV reports the message “My EyeTV: Router Incompatible”, you may still be able to resolve the problem.
1) Test your router for compatibility
The Back to My EyeTV service is very similar to the Back to My Mac service that Apple offers for OS X, as a part of MobileMe. If Back to My Mac works with your setup, then so should My EyeTV.
Apple provides a partial list of routers that support Back to My Mac (and thus My EyeTV):
http://support.apple.com/kb/TS1304
This list has notable exceptions, namely the AirPort Base Station (Graphite) and AirPort Base Station (Dual Ethernet) do not support Back to My Mac.
2) Turn NAT-PMP and UPnP On
If you have a compatible router, you may need to use a web browser to visit an administrative page for that router, where you can activate NAT-PMP and UPnP. See the documentation of your router for the instructions, including the login credentials and password – most routers have an unique interface.
3) Test Back to My Mac
If you’re not already a MobileMe subscriber, you can sign up for a 60 day trial to test Back to My Mac. If you can get that working with your setup, then My EyeTV should also function.
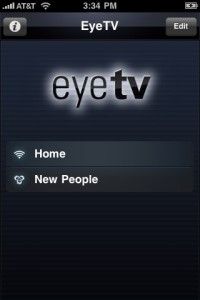
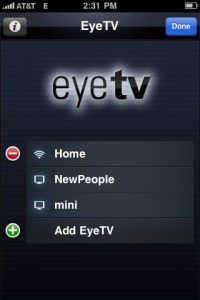
Finding your Mac using My EyeTV
To use My EyeTV with your iPhone, you will have to log in.
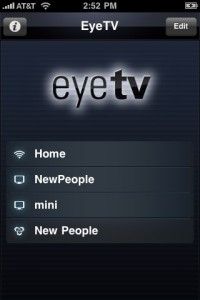
1) Press the Edit button at the top right corner of the menu.
2) Select Add EyeTV
3) Enter your My EyeTV email address and password, then press Save.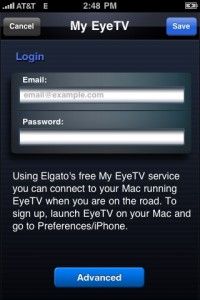
4) After a few seconds, My EyeTV will list your Macs that are signed into My EyeTV.